الاحصائيات

الزوار

Images de thèmes de Storman. Fourni par Blogger.

إشتراك RSS

Featured Posts

dimanche 29 mai 2016

Radar Detector Mrv-66t 6 Band (MRV-66T)

- Aucun commentaire

Product Detail

 Basic Info 

Model NO.: MRV-66T56USD New Design Mirror Radar Detector Mrv-66t 6 Band (MRV-66T)

 Product Description

YUPITERU SVE-66T 6 BAND (X/K/New K/Ku/Ka/Laser) Radar Detector (car radar) 
Basic Operations Cordless Type (powered by solar battery) 
1. Responds to all types of radar currently in use by police
2. Detection area: Front/rear, Laser detecting: 360 degree laser 
3. Optimize selectivity: City/highway
4. Alert type: Voice/Audio/visual
5. Auto Mute function
6. Power: Solar/Power Power cord 
7. Product Size: 72*29*106(mm)

1. [PWR] (Power) switch: 
This is the switch to turn the power ON of the unit. 

2. [DIMMER] button: 
Pressing this button makes the pilot lamps less brighter. 
This button is useful when driving the car in the night or to make the battery consumption less. 

3. [SENS] button: 
This button is to change the level of sensitivity to detect the radar signals. 
City mode (lower sensitivity): Sensitivity LED [(((Y)))] will be lit in red. This mode is suitable when driving the car in the city area in low speed. 
Highway mode (normal sensitivity): Sensitivity LED (Antenna mark) will not be lit. This mode is suitable when driving the car in suburb or on highway in rather high speed. 

4. [T/MUTE] button: 
This is to test the alarm sound or mute the alarm. Also this is used to adjust the volume of the alarm sound. 

5. [SOUND] button (Electric alarm/Voice alarm select switch): 
You can change the alarm type between the electric sound alarm and the voice alarm (in Chinese). 

6. X/K/New K/Ku/Ka/Laser 6-Band detection: 
SVE-66R detects X, K, New K, Ku, Ka and Laser band and alarms differently as follows. 

X band: 
Alarm: Caught the radar signal intermittent alarm (pi...Pi...Pi, 5 sec. ) Voice alarm Continual alarm (pipipipi. )
[X/Ka] LED: Lit in Red
K/New K band: 
Alarm: Caught the radar signal intermittent alarm (bi...Bi...Bi, 5 sec. ) Voice alarm Continual alarm (bibibibi. )
[K/Ku/L] LED: Lit in Yellow
Ku band: 
Alarm: Caught the radar signal intermittent alarm (kyui...Kyui...Kyui, 5 sec. ) Voice alarm Continual alarm (kyui, kyui, kyui. )
[K/Ku/L] LED: Lit in Green
Ka band: 
Alarm: Caught the radar signal intermittent alarm (kyolo...Kyolo...Kyolo, 5 sec. ) 
Voice alarm Continual alarm (kyolo. Kyolo. Kyolo. )
[X/Ka] LED: Lit in Green
LASER band: 
Alarm: Intermittent alarm (piroro...Piroro...Piroro, 5 sec. ) 
Voice alarm Continual alarm (piroro, piroro, piroro. )
[K/Ku/L] LED: Lit in Orange

7. Pilot & Battery lamp
Pilot & Battery lamp will blink after the power is ON. And it indicates the battery level while pressing TEST/MUTE button (lit in green: Full battery, lit in orange: A little low, lit in red: Need recharging). The low battery will be alarmed by blinking of Pilot & Battery lamp and low battery alarm sound. In the case, please recharge the battery using the cigarette lighter plug cord. 

8. Auto Quiet/Dimmer function: 
When the radar detector keeps receiving the radar signal for more than 30 seconds, the alarm sound becomes smaller and alarm lamp becomes less bright.

How to Choose a GPS Tracker

- Aucun commentaire

GPS Tracker Review

How to Choose a GPS TrackerSilverCloud-TAG-gps

The top performers in our review are the Amber Alert GPS, the Gold Award winner; the PocketFinder, the Silver Award winner; and the Trackimo, the Bronze Award winner. Here's more on choosing a product to meet your needs, along with detail on how we arrived at our ranking of 10 products.
GPS trackers are transmitters that allow you to keep track of your children or possessions. They come with dedicated apps or computer programs that allow you to see the location of the tracker on a map. They're small and come in several forms, such as watches and tag-like plastic discs.
GPS technology is integrated into several different systems. Perhaps the most common application is the turn-by-turn directions of car GPS units. GPS receivers are also present in most smartphones, but of course using your smartphone for navigation decreases your battery and your data allowance.
GPS trackers are small, tough devices with two main parts: built-in GPS receivers and cellular radio transmitters. They pinpoint their positions from the GPS satellite system and then transmit location data to a server using a cellular provider's network. This means that they require a SIM card and cellular service in order to work.
While some GPS trackers have the cost of service as part of their initial price, the overwhelming majority requires a service plan from AT&T or T-Mobile. Monthly subscriptions typically cost between $10 and $40 per month, and the GPS trackers we reviewed range in price from $80 to about $250. For further reading, we offer articles about GPS trackers.

What About Smartphones?

All modern smartphones have GPS receivers built into them. You can purchase apps that can track the location of your smartphone.
However, there are several reasons to buy a dedicated GPS tracker over a smartphone. For one, smartphone data plans are more expensive than even the most expensive GPS tracker data plan. So, if you want to track your child who isn't yet old enough for a smartphone, then GPS trackers are a more affordable way to do it.
Second, they typically have better battery life than smartphones. This means that in an emergency you can rely on a more dependable battery. Third, they are more discreet than smartphones. In a worst-case abduction situation, a GPS tracker is far more likely to go unnoticed than a smartphone.

GPS Trackers: What We Tested, What We Found

Ease of Use
All the GPS trackers we reviewed can automatically track their movements and send that information to your phone. One of the biggest differentiators between trackers, then, is how easy it is to use them.

In our testing, we used each tracker extensively. We set zones, checked history and took them on over 30 car rides. (Zones, sometimes called geofences, are defined by preset boundaries that trigger an alert to your smartphone.) Because of this extensive use, we were able to assign each tracker's application or web interface a score for its ease of use. The score was based on several factors, including ease of activation, tracking, setting zones and checking movement history.
Battery Life: Closely Related to Update Intervals
We tested battery life by charging each of the 10 trackers to their full capacities and then setting their intervals, when possible, to update their locations once every 10 minutes. Several of the trackers have motion-activated tracking intervals, so we made sure to move the trackers at least 2 miles four times per day. All the trackers were kept in a box together to ensure identical testing conditions.

Perhaps not surprisingly, we found that the motion-activated trackers tended to have two and sometimes three times the battery life of the trackers that work solely on update intervals. Also, the larger the tracker, the longer the battery life. The battery life varied wildly, from the Trax's 30.75 hours to the BrickHouse Security Spark Nano's incredible 161 hours. All the devices we tested lasted well over 24 hours.
Hardware Quality
We assigned a hardware quality score that takes into account the quality of the materials used, projected ability to withstand damage, portability, versatility of the form factor, operator ease of use, button quality, charging port quality and port cover quality.

We did this to quantify small things. For example, watches are less versatile than a small box, so the two watches we reviewed received a small demerit for that. It was also rather easy to tell which products were made more solidly and with higher-quality materials. Another thing we looked at was charging ports and chargers. The PocketFinder received a significant credit for having a cradle charger that is simple to use.
Top Ten Reviews seeks, whenever possible, to evaluate all products and services in hands-on tests that simulate as closely as possible the experiences of a typical consumer. We obtained the units in our comparison on loan from the companies or through retail purchase. The manufacturers had no input or influence over our test methodology, nor was the methodology provided to any of them in more detail than is available through reading our reviews. Results of our evaluations were not provided to the companies in advance of publication. 

What Else is Important in Selecting a GPS Tracker?

Voice-to-Voice Calling & Panic Buttons
Some GPS trackers include voice-to-voice calling. This enables the bearer to call a preselected number by pressing a button on the device. Other trackers have panic buttons that trigger a text message and email alert to preselected phone numbers and email addresses. These features are especially useful if the bearer does not have a cell phone.

Speed-Limit Alerts
Many GPS trackers allow you to set speed-limit alerts. If the tracker travels over a certain speed, it will send you a text message or email alert. This is useful for tracking a teenage driver, so you can keep them accountable for their driving habits. In more serious scenarios, it can show you when your child has entered a stranger's car.

International Use
One of a GPS tracker's most important uses is making sure you don't lose track of a loved one, and one of the easiest places for that to happen is in an unfamiliar country. The Trax, one of the better GPS trackers we reviewed, comes with free international use, so it's the best choice if you do a lot of traveling.

Our Recommendations

The best GPS tracker on the market is the Amber Alert GPS. This is mostly because of its lengthy feature list, which includes voice-to-voice calling, a panic button and an above-average app. It also is made of extremely high-quality material. It's not perfect, however. It has relatively poor battery life, lasting 42 hours in our tests. It also only can track in five-minute timed intervals.
If you don't need voice-to-voice or a panic button, the PocketFinder is the best option for you. Its build quality is the best of any tracker we reviewed, and it has an intuitive app. It's the ultimate "set it and forget it" GPS tracker. It also has truly exceptional battery life. In our tests it lasted over 100 hours.
The best value is the Trackimo. Its two-year ownership cost is the second lowest of any tracker we reviewed, at just under $200. It's motion-activated, so even with its diminutive size, it still has excellent battery life. It has a panic button and an easy-to-use, well-designed app.

samedi 28 mai 2016

RYOBI EXCIA molinet 5006

- Aucun commentaire

RYOBI EXCIA molinet 5006


Ryobi-Slam 0076


Le seul moulinet Ryobi que je possédais avant le Slam est cette espèce de « chose » ci-dessous, à 0 roulement, que j’avais acheté dans un supermarché il y a plus de 25 ans et dont la manivelle à masselotte m’avait bêtement séduit. Inutile de vous dire qu’au bout de deux ou trois utilisations, je l’ai remisé sur une étagère en poussant un soupir, mais ce n’était pas grave car je ne l’avais payé que quelques dizaines de francs à l’époque.
Ryobi-Slam 0092

J’étais donc vacciné contre cette marque Japonaise plus connue pour ses appareils de bricolage électroportatifs. Entretemps bien sûr Ryobi s’est rattrapé en sortant le « Safari » qui existe toujours et dont la solidité n’est plus à démontrer ainsi que quelques autres modèles vendus sous diverses appellations de différentes marques, son avatar le plus célèbre étant le Zauber qui s’est vendu sous des tas de noms différents. Puis vers les années 2000 Ryobi a revendu son secteur pêche à une société chinoise et on en a moins entendu parler, si ce n’est pour certains modèles comme le Carnelian et l’Artica, aux qualités douteuses selon ses utilisateurs.
En 2014 Ryobi nous sort le modèle Slam, aux caractéristiques plutôt alléchantes, jugez plutôt :
Caractéristiques :
- 6 roulements japonais inox
- Bâti, carter, rotor Carbone/Titanium NCRT 20% plus léger et 40% plus résistant que les composites graphite habituels
- Engrenages haute précision RFO
- Axe Titanium renforcé
- Anti-retour infini à aiguilles
- Guide-fil Titanium anti-vrillage
- Anse de panier creuse Titanium
- Bobine aluminium avec inserts "woven carbon"
- Frein waterproof multidisque micrométrique, progressif et puissant
- Manivelle CNC anodisée
- Bouton de manivelle EVA ergonomique, ultra-léger

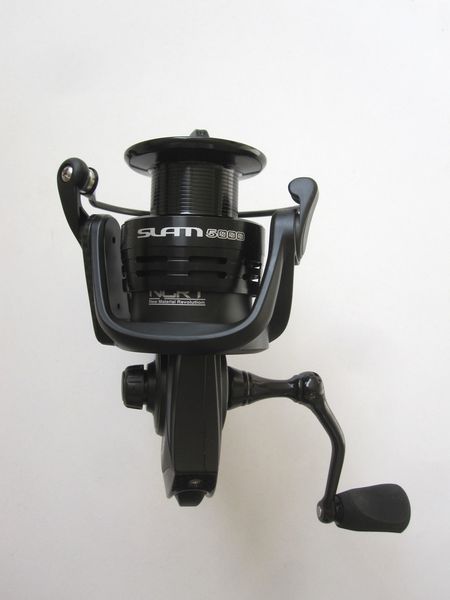
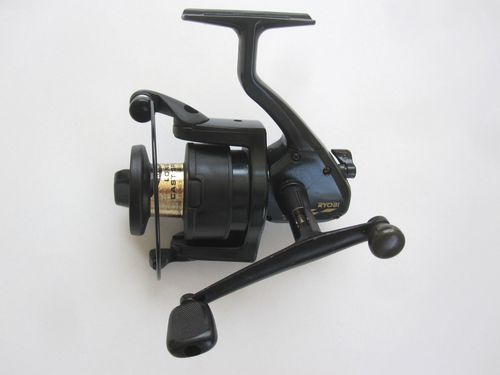
Sur le papier c’est prometteur ! J’ai donc choisi le modèle 5006 (on le trouve également en taille 1006 et 3006) pour un poids de 315g avec un frein annoncé à 7,5kg. En fait c’est le modèle 5000 et il existe un modèle 6000, à peine plus gros.
Ryobi-Slam 0064
Ryobi-Slam 0067
Ryobi-Slam 0070


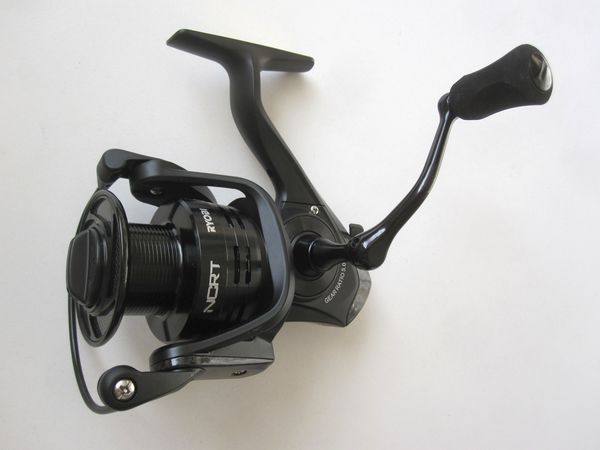
L’aspect général et la finition « all black » avec inserts carbone sont assez réussi et il est en effet très léger avec un poids réel de 317g. La fluidité est correcte, meilleure que celle du Fin-Nor Sportfisher que nous avons vu précédemment, mais il n’est livré qu’avec une seule bobine.
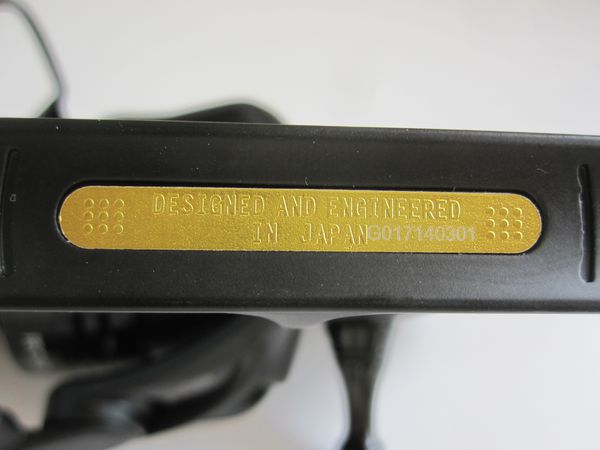
Sur le pied est inscrit : « Designed and engineered in Japan » ce qui est sûrement faux puisque comme on le sait, les moulinets Ryobi sont désormais sous licence chinoise. Un numéro de série est apposé, au cas où on vous le vole sans doute
Ryobi-Slam 0078


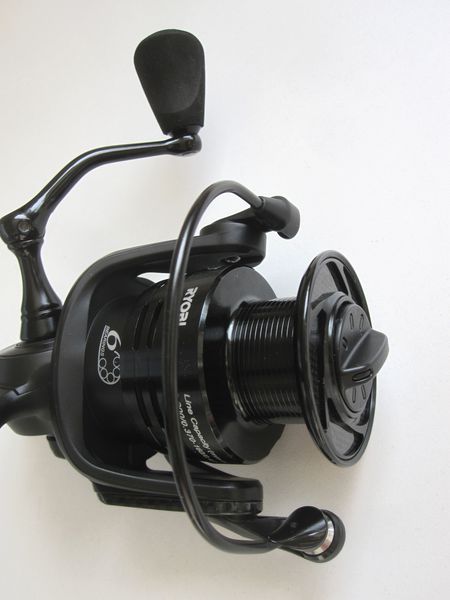
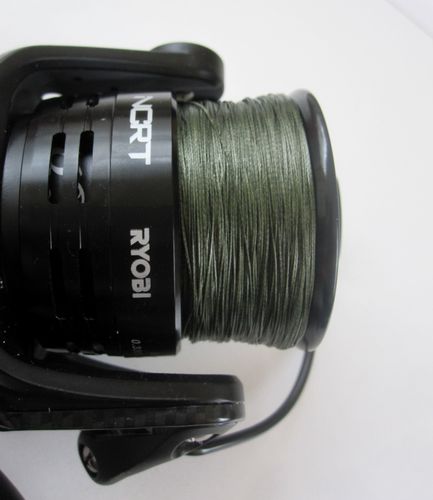
La bobine, le frein et l’axe
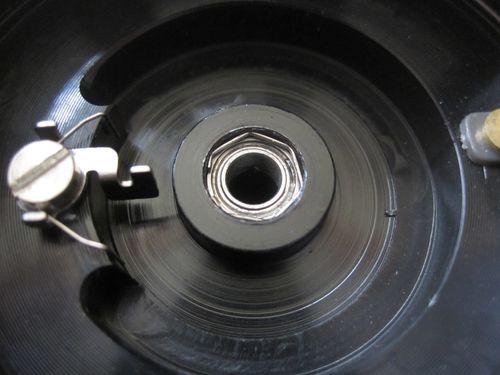
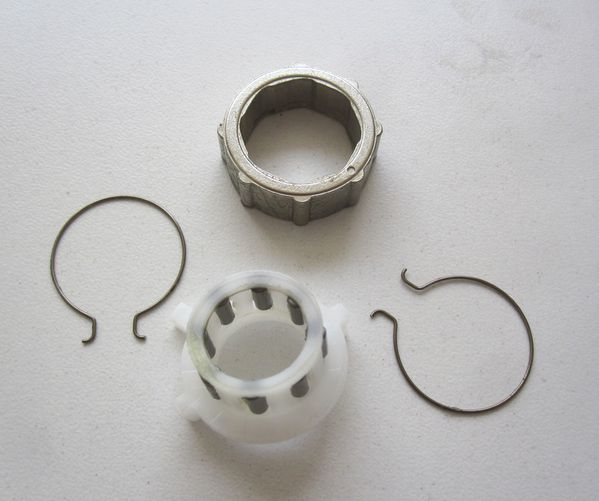
La bobine est en aluminium ajouré avec des inserts carbone sur le dessus pour faire joli mais je doute que ça allège l’ensemble. Assez large, elle semble bien adaptée au lancer léger/mi-lourd. Elle possède à sa base un roulement maintenu par un petit clip, disposition plutôt originale car les roulements se positionnent sur l’axe d’habitude, mais le résultat est le même : ça aide à diminuer l’inertie du frein, c’est toujours une bonne chose.
Ryobi-Slam 0105
Ryobi-Slam 0237


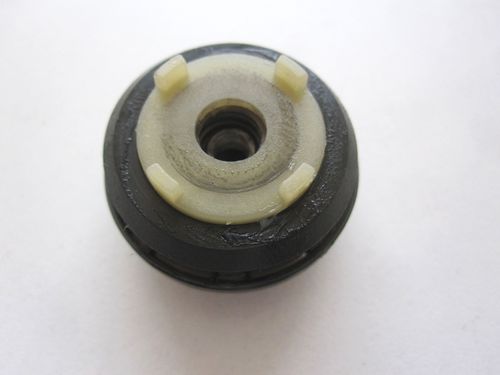
Le bouton de frein est scellé par une sorte de capsule en plastique possédant 4 ergots qui viennent ensuite s’emboîter au sommet de la pile, sans doute pour éviter que les différents disques ne tournent. Le ressort est en partie invisible mais j’ai l’impression qu’il est assez large et efficace. Un petit joint en caoutchouc sur le dessous vient justifier la mention « waterproof » mais comme je l’ai déjà dit, ces joint ne sont pas étanches, tout au plus protègent-ils la pile des intrusions de sable et de sel en excès.
Ryobi-Slam 0101Ryobi-Slam 0103


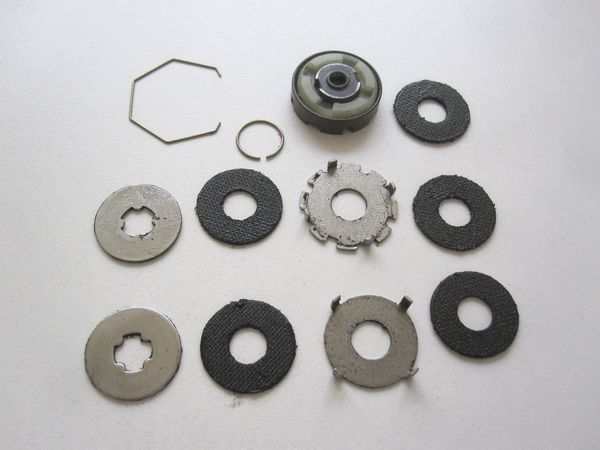
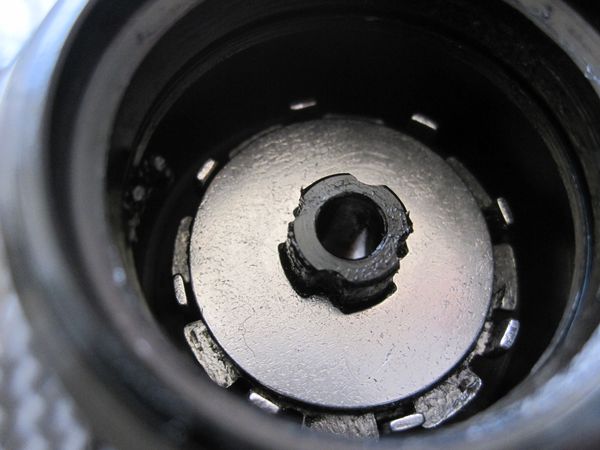
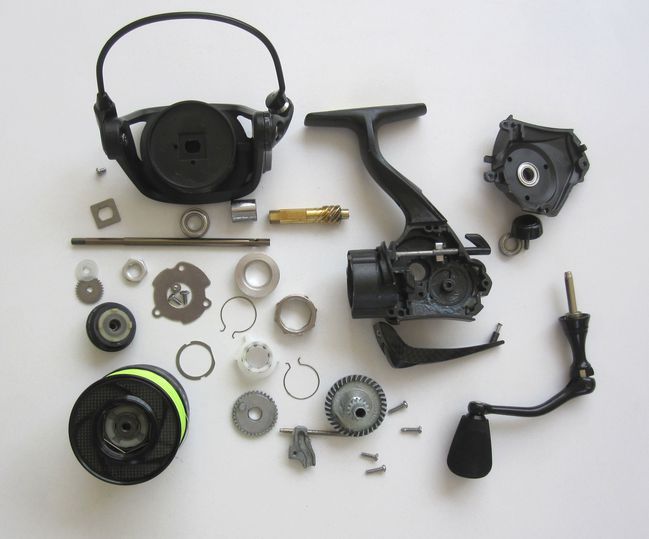
La pile de frein est à mon avis inutilement compliquée. Pas moins de 5 disques en carbone imbriqués dans un système de disques en acier dont les pattes se fixent dans des encoches prévues à cet effet pour maintenir la cohésion.
Ryobi-Slam 0115
Ryobi-Slam 0107


 Au fond, le moyeu de la bobine est en croix pour que l’ensemble de la pile vienne s’y insérer sans tourner.
Ryobi-Slam 0116


Je préfère de loin le système du Penn Conflict ou du Fin-Nor Spinfisher, plus simple et tout aussi efficace. Le problème de cette pile est qu’elle ne se démonte pas aisément, chaque pièce devant être bien à sa place sous peine de perdre en puissance de freinage.
Autre problème lorsque je testais la puissance du frein au peson, une brusque perte d’adhérence au bout de plusieurs tractions autour de 6kg : le frein retombait à 3kg alors que l’écrou n’avait pas bougé. En examinant la pile en détail, je me suis rendu compte que c’était dû à un excès de graisse sur les disques ; en chauffant, ils liquéfiaient la graisse qui coulait au fond de la pile et la faisait patiner. Une fois les différents disques bien essuyés le problème à disparu et j’ai atteint (et même un peu dépassé) les 7,5kg de puissance annoncée, bouton de frein serré presque à fond. Pour une fois pas de mensonge sur la puissance du frein ! Le bras du galet à bien supporté l’épreuve sans toucher la bobine. L’axe n’a pas bronché. Le seul reproche que je ferais à ce frein est son manque de régularité. A partir de 5kg, on sent des à-coups sur les longues tirées, c’est certainement dû à l’étroitesse de l’axe et de la rondelle de retenue de la bobine, qui doit avoir tendance à s’incliner d’un côté ou de l’autre et qui ne place pas la bobine parfaitement parallèle à l’axe, d’où cette sensation de frottement parfois. Alors 7,5kg oui, mais on est loin de la fluidité du Fin-Nor, ce frein est assez irrégulier, bien que puissant.
Bien sûr cette puissance de 7,5kg est le maximum que ce moulinet peut supporter et sûrement pas longtemps : l’antiretour risque de lâcher avant les disques comme nous le verrons plus loin. Disons que sa plage  raisonnable d’utilisation se situe autour de 4/5kg, ce qui permet de mater n’importe quel poisson d’eau douce de moins de 20kg avec un peu de patience et de douceur. Pour la mer, divisez par deux ! C’est finalement tout à fait acceptable compte-tenu de la taille relativement modeste du moulinet.
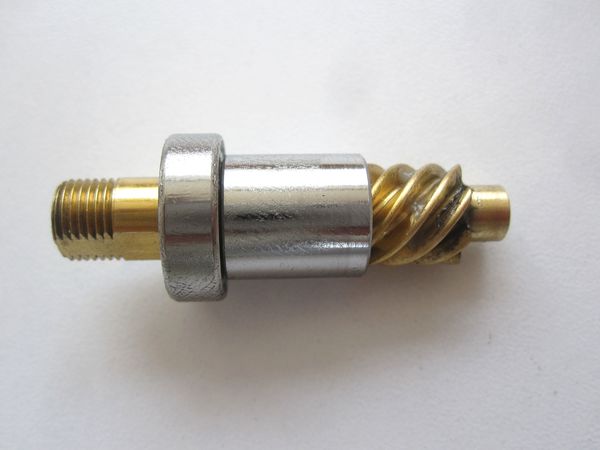
L’axe lui-même est donc très fin avec ses 4mm de diamètre et lorsque je l’ai vu j’ai eu du mal à croire qu’il était en titane, à cause de sa couleur tirant légèrement vers le bronze. Pourtant, une fois pesé et comparé avec une tige en acier de même diamètre et de même longueur, force est de constater qu’il pèse deux fois moins et qu’il est amagnétique. Conclusion : ce n’est peut-être pas du titane pur mais ça y ressemble bougrement. La couleur s’explique soit par une trempe ou par une anodisation (le plus probable), soit par un alliage au cuivre, en tout cas cet axe est très léger, très solide et totalement inoxydable. Ce n’était donc pas du Pipotium, ni du Baratinium comme je l’avais craint un instant ! Dommage qu’il soit si fin car comme nous l’avons vu, cela influe sur la régularité du freinage. L’idéal serait une section de 5mm ou alors de lui adjoindre un manchon en laiton, quitte à l’alourdir. 
Ryobi-Slam 0119Ryobi-Slam 0130
Ryobi-Slam 0127
Ryobi-Slam 0129


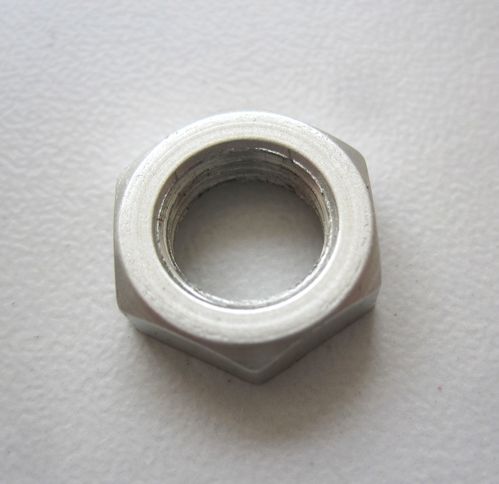
L’écrou qui maintient le rotor est vraisemblablement lui aussi en titane.
Ryobi-Slam 0133


Le rotor
Réalisé en Carbone/Titanium NCRT selon le fabriquant, il serait plus léger et plus résistant que les autres composites. Daiwa a le Zaïon, Shimano le CI4, pourquoi pas le NCRT… En tout cas les bras sont robustes pour leur taille et ne se sont que peu déformés, même à 8kg de traction.
Ryobi-Slam 0181
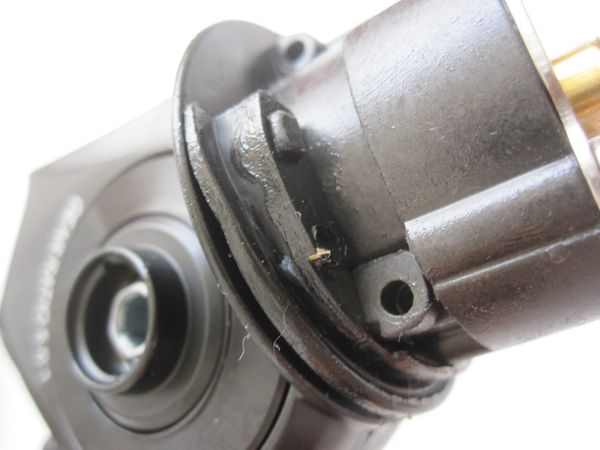
A noter qu’à sa sortie, le pignon est maintenu par une pièce métallique carrée avant l’écrou de fixation : un + pour la solidité.

 Je ne sais pas si l’arceau de pick-up est en titane creux, mais c’est plausible.
Le ressort à compression est très costaud et effectivement il claque fort quand on le referme (d’où le nom du moulinet « Slam » : claquer en anglais ?).
Ryobi-Slam 0193


Une vis externe côté galet et une interne de l’autre.
Ryobi-Slam 0188


Le galet est monté sur un roulement et il est lui aussi en titane (ou en alliage de titane). Il tourne parfaitement.
Ryobi-Slam 0184


Un très bon et très solide ensemble rotor/pick-up qui ne devrait pas flancher au bout de quelques utilisations, comme c’est souvent le cas.

L’antiretour
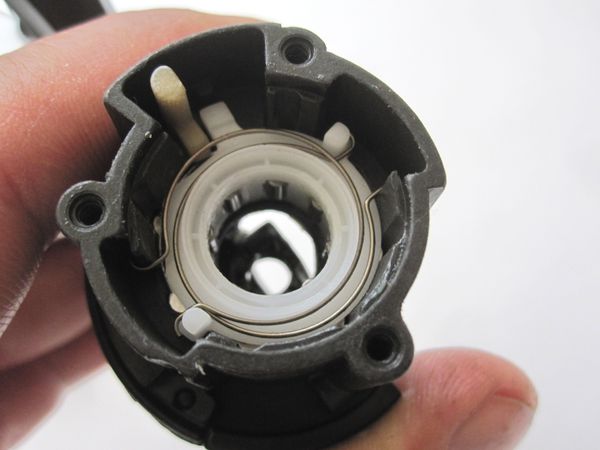
Nous avons là un antiretour typiquement Chinois : Equipé de 8 rouleaux, il n’est pas muni des traditionnels ressorts en V mais d’un système de collier actionné par deux ressorts circulaires. Lorsque l’antiretour est engagé, le collier en plastique comprime les rouleaux contre le collier en acier tous en même temps et non pas individuellement comme avec les ressorts en v. C’est efficace, mais le problème avec ce type d’antiretour c’est que souvent un léger recul se fait sentir et c’est le cas ici. J’émets aussi quelques réserves sur sa capacité à supporter longtemps 7,5kg de traction continue… Disons que pour des poissons de taille moyenne, il ne devrait pas poser de problème.
Ryobi-Slam 0173
Ryobi-Slam 0159


Le train d’engrenage
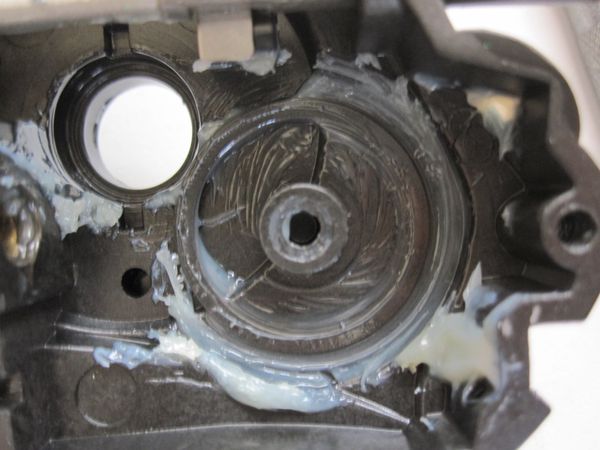
En démontant le rotor, on s’aperçoit qu’il y a un joint d’étanchéité à la base du bâti. C’est bien mais pourquoi ne fait-il pas le tour complet ? On va dire que c’est un petit plus.
Ryobi-Slam 0134Ryobi-Slam 0179


Le pignon en laiton est porté par un roulement après l’antiretour et par une gorge sans palier. Cette absence de palier se justifie par la nature composite du bâti, qui absorbera mieux les frottements que l’aluminium, mais un petit roulement aurait été préférable.
Ryobi-Slam 0169Ryobi-Slam 0167


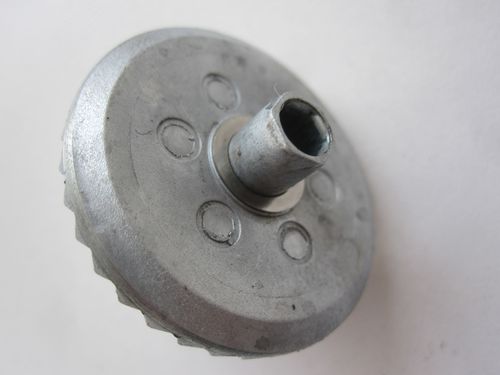
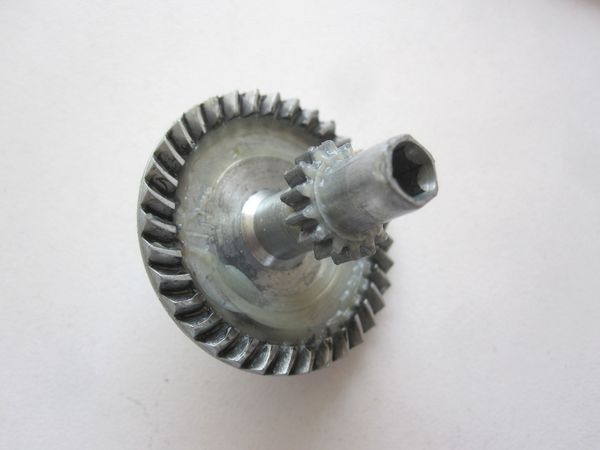
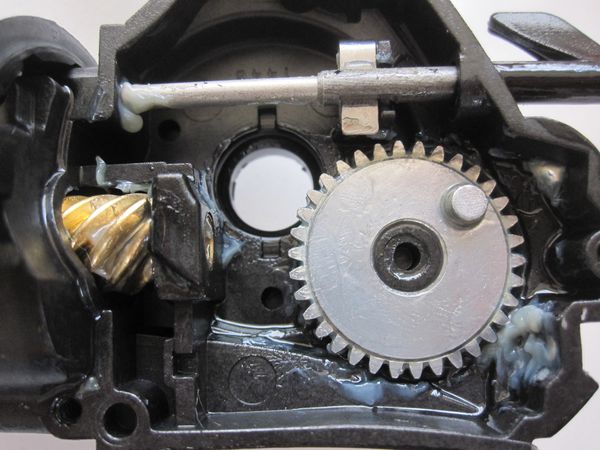
La roue de commande est bien proportionnée, assez large et vraisemblablement en fonte d’aluminium de bonne qualité. Pour le prix, il n’y a rien à redire. Elle est portée par deux roulements, c’est la moindre des choses…
Ryobi-Slam 0137
Ryobi-Slam 0140


Le système d’oscillation est le classique combiné roue à ergot + came en S, le tout en fonte d’aluminium aussi. Comme pour le pignon, la roue à ergot repose directement sur un petit bourrelet du bâti en composite. Ça frotte mais c’est tolérable.
Ryobi-Slam 0150
Ryobi-Slam 0177Ryobi-Slam 0143Ryobi-Slam 0146


La came d’oscillation est soutenue par un guide qui la traverse et qui est fixé en bas du châssis. C’est efficace et solide, elle ne risque pas de dérailler, mais un rail ou un guide supplémentaire en haut aurait été encore mieux.
Dans l’ensemble, les frictions sont assez faibles mais bien entendu il faudra voir avec le temps et mettre de la graisse régulièrement pour éviter cette sensation de « grattage » si courante avec ce type d’engrenage.
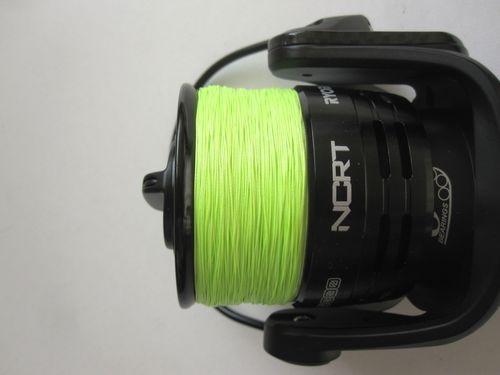
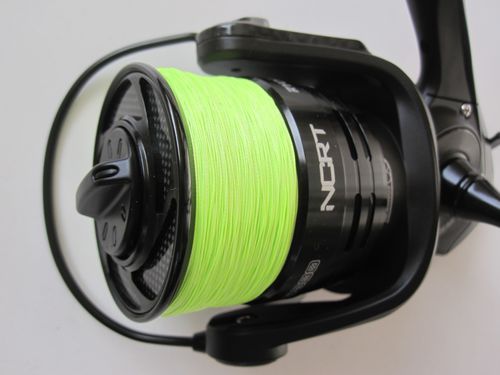
L’enroulement obtenu est correct, bien qu’il manque un peu de régularité. Un léger bourrelet se forme en haut et en bas de la bobine, comme pour le Penn Conflict. Ça ne gêne pas les lancers et n’occasionne pas de perruques, c’est juste inesthétique. Deux cales supplémentaires sont fournies pour varier la forme de l’enroulement mais franchement elles n’ont pas beaucoup d’incidence : en rajoutant une cale, l’enroulement reste pratiquement identique, un peu plus conique. Par contre, en enlevant la cale d’origine et en la remplaçant par une des cales d’appoint (moins épaisses), on obtient un enroulement conique inversé, bien meilleur à mon avis en termes de distance de lancer. C’est finalement la configuration que j’ai choisi, bien que cela accentue les bourrelets...
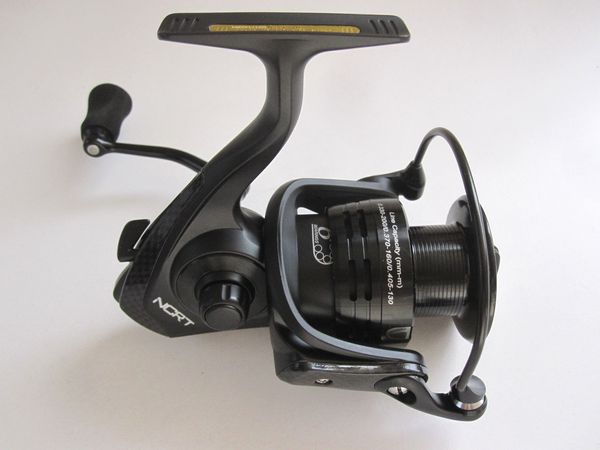
Ryobi-Slam 0079Ryobi-Slam 0083Ryobi-Slam 0231


La manivelle
Elégante manivelle tournée comme une pièce d’échec à sa base, elle est malheureusement de type hexagonal, avec les problèmes de jeu qui vont avec. Ici pour le coup je m’attendais à ce qu’elle se visse directement dans la roue de commande ! Et effectivement il y a du jeu, même serrée à fond, dommage.
Ryobi-Slam 0121


Pas de joints d’étanchéité des deux côtés du carter, il faudra donc penser à bien graisser ce traditionnel point faible pour prévenir les intrusions d’eau.
La poignée se démonte facilement mais n’est pas portée par un roulement, seulement un palier. Elle est en EVA de bonne qualité, confortable en cours d’utilisation.
Ryobi-Slam 0126


Le test en condition réelle
Trois matinées passées en sa compagnie au bord du lac de Bimont m’ont apporté la preuve que ce moulinet était un excellent lanceur. Plus de 60m la plupart du temps, avec diverses tresses et des leurres entre 20 et 65gr (et une nouvelle canne dont je parlerai bientôt, ma Tenryu ayant rendu l’âme…). Aucunes perruques à signaler. Le pick-up très solide ne se rabat pas même sur des lancers très soutenus. Grâce à son poids très léger, il se fait complètement oublier en action de pêche et sa fluidité reste bonne.
Ryobi-Slam 0224
Pas beaucoup de poissons actifs en ce moment hélas, seule une misérable perche de 20cm viendra taper sur mon crankbait en tout et pour tout ! Je n’ai donc pas pu juger le frein sur un poisson combatif. Il faut dire que juillet est un mois difficile car le garde-manger des carnassiers regorge de victuailles : les perches se gavent d’alevins et les brochets n’ont que l’embarras du choix, il leur suffit d’ouvrir la gueule  pour engamer des bancs d’ablettes entiers ! L’abondance de nourriture ne joue pas en notre faveur, messieurs les carnassiers jouent les fines gueules… Peut-être aussi que le pauvre pêcheur que je suis n’a pas su trouver la bonne technique ! Toujours est-il que j’ai vraiment apprécié le Slam, sa légèreté et son pick-up solide, sa capacité à lancer loin et son ratio bien adapté à la pêche aux leurres. Il me rappelait presque par certains côtés les anciens Mitchell 300, je ne sais pas pourquoi, juste une sensation…


Conclusion
De mes trois bêtes noires (Penn Conflict, Fin-Nor Rainer Korn et Slam), c’est donc bien le Slam qui arrive en tête, sans discussion possible. Ses composants de qualités, son frein réaliste, ses engrenages honnêtes et enfin son prix raisonnable (moins de 120€) le place en haut du podium des moulinets légers moyen de gamme récemment sortis dans le commerce. Vous pourrez l’utiliser sans problème en mer pour les pêches au lancer, en traction et en verticale, si vous prenez la précaution de bien essuyer la graisse trop abondante qui recouvre les disques de frein. Presque totalement inox et intelligemment conçu, il devrait pouvoir dépasser les 3 ans d’espérance de vie, ce qui en ferait alors un vieillard compte tenu de l’obsolescence programmée de ces chères machines… Je lui mets donc un bienveillant 12,5/20 en espérant qu’une version plus musclée voit le jour, avec un engrenage Wormshaft, un frein simplifié, un meilleur antiretour et une bobine supplémentaire siouplait. Il faut bien comprendre que le Ryobi Slam n’est pas une bête de concours et ma conclusion définitive pour tous ces moulinets à moins de 150 € est qu’il leur manque toujours quelque chose. Aucun n’atteint vraiment un niveau de fiabilité suffisant ; il y a toujours un détail qui cloche, que ce soit au niveau du frein, de l’axe, des engrenages, de l’antiretour ou de la manivelle. Je dirais même que c’est fait exprès. Je ne suis pas ingénieur, mais si je voulais fabriquer un bon moulinet à coût raisonnable, je saurais comment m’y prendre : Un frein en carbone simple avec un axe suffisamment épais, une bobine large et légère, porté par un roulement, un antiretour solide, des engrenages en alliages d’aluminium plutôt qu’en zinc (ou alors en alliage de zinc de qualité, pas du Zamak basique!), un système d’oscillation précis et une manivelle qui se visse dans la roue de commande.  Est-ce trop demander ? Il semblerait que oui. Seuls les modèles à plus de 200€ réunissent en général ces conditions (j’en parlerai prochainement) et je trouve cela dommage dans la mesure où ces trois moulinets, si l’on prend en compte leurs qualités respectives, pourraient n’en former qu’un seul qui  serait tout à fait correct, la preuve que c’est possible. Mais les fabricants en vendraient moins… L’offre pléthorique que nous avons actuellement en matière de moulinet est une affaire de tactique commerciale bien rôdée ! L’idée est simple : la plupart des pêcheurs n’osent pas investir dans un moulinet correct à plus de 200€ (seuil psychologique), donc on leur en propose une multitude à 120/150€ qui ne feront qu’une saison, ce qui les obligera à en acheter un autre la saison suivante, arguments novateurs à l’appui, comme ça on leur fait dépenser d’avantage d’argent de manière indolore. Il y a bien sûr des exceptions comme le Shimano Spheros FB en taille 4000 ou 5000 ou le Abu Garcia Soron 40 qui sont des moulinets très performants dans cette gamme de prix, mais mon conseil si vous ne voulez pas perdre 150€ par an (et j’en ai perdu bien plus cet année, volontairement) c’est de vous tourner vers des produits plus chers mais beaucoup plus fiables. Le prochain moulinet que j’examinerai entre dans cette catégorie, mais j’essaierai toujours de trouver les meilleurs rapports qualité/prix car les arnaques existent aussi dans le « moyen haut de gamme »… Je publierai d’ailleurs en fin d’année un tableau récapitulatif afin que chacun s’y retrouve, selon ses moyens.
A suivre…

Ryobi-Slam 0161


Texte et photos : Jean-Paul Charles

Syma X5C Quadcopter Review and Giveaway

- Aucun commentaire

Syma X5C Quadcopter Review and Giveaway


Let’s get this out of the way: if you’ve any interest in drones but have been put off by the price, buy the Syma X5C. The X5C flies remarkably well, handles smoothly and the drone is surprisingly well built. It’s not without its flaws however: the remote is poorly made, the battery life is pretty short and the camera is barely worth mentioning.
The Syma X5C can be purchased on Amazon for around $60, but at the end of this review we’ll be giving ours away! Although the Syma X5C is one of the cheapest quadrocopters with an HD camera, the Juyo Vonsan is $10 cheaper and has a resolution of 640 x 480, and the market is flooded with sub-$30 mini-drones without a camera. Syma also a cameraless X5 for around $40.

What’s in the Box

The Syma X5C comes with everything you need to start flying. In the box is the drone, two spare propellers, four propeller guards, the remote control, the drone’s battery, a charger, a screwdriver, a 2 GB micro SD card, an adaptor for connecting it to your computer, and the passably translated instruction manual.
Before starting you need to attach the prop guards and put four AA batteries in the remote.

The Build Quality

When I opened the box and removed the X5C I was shocked. The drone felt great.
It’s extremely light but solidly built. Picking it up I was amazed at how well made it felt. Unlike many cheap products, nothing rattles or shakes when you hold it. The propellers spin freely and are perfectly balanced.
Nothing about the drone screams “I cost less than fifty dollars!”
The same cannot be said about the remote. It’s light, rattles, and has fake buttons that do nothing. While the control sticks are, like the drone, surprisingly good, the overall package is mediocre. The control sticks provide about the right amount of resistance when you fly; you won’t accidentally push one too far but nor will you struggle to move one. The buttons and switches, on the other hand, are awful. It’s certainly not a deal breaker though.
The manual that comes with the drone isn’t bad at all. It’s clearly been translated into English but is still understandable. Puzzling out what everything on the remote does takes a little while — especially because some of the buttons do nothing — but it’s worth doing.

Flying the X5C

Once you’ve charged the battery and attached the propeller guards, the X5C is ready to fly. It’s small and stable so you can easily fly it indoors. Whatever you do, make sure the first place you fly it has a soft landing spot.
The X5C handles brilliantly. There’s none of the automated bells and whistles that are built into more expensive drones so you’re in full control all the time. Balancing the throttle so that the X5C hovers at roughly the same height rather than rocketing into the ceiling or plunging into the floor requires a bit of practice. You will crash the X5C at least a few times until you get the hang of the controls, but it’s built well enough to handle a few bumps.
The controls are also quite sensitive. Small tweaks to power or direction only need the lightest touch on the control sticks. Overcompensating is far more likely to lead to an out of control drone than undercompensating. Managing your own reactions and adjusting the controls carefully when the X5C is flying towards you is the second hardest thing to learn.
The hardest is that all the controls are relative to the drone. If the drone is facing towards you and you push forward on the control stick, it will fly towards you and not away. I found it best to always keep the X5C orientated so it was facing roughly away from me. This meant the controls behaved naturally.
inflight
The X5C flies better outdoors as long as there is no wind — and I mean no wind. The X5C is extremely light and anything above a slight breeze will quickly have it floating off in the direction of the nearest tree. Indoors, the propellers are powerful enough to create some turbulence underneath the drone that can knock it off course. However, this has the advantage of teaching you to respond quickly and carefully on the controls.
below
If the X5C isn’t flying stably, on the remote you can adjust the power balance to the propellers. This means you can correct any drift on the X-Z axis. I never had to.

The Camera

The X5C’s camera is fine and that’s really the highest praise I can offer. It’s got a 2MP camera that’s capable of 720p video as well. Neither the images nor the video look particularly good. If you’re interested in taking a video of the roof of your house or your kids playing football in the park then it will do. If you want to take amazing aerial photography you’re going to need to invest a little more than $50.
camera
The battery lasts for about seven minutes. As it starts to die, the X5C will lose power and that’s your cue to land it before it takes on the aerodynamic properties of a rock. If you’re serious about flying it regularly, I’d recommend picking up two or three extra batteries. Changing them is easy.
Syma also offer an X5 that doesn’t come with the camera for a little less. If you’re just buying the drone to practice flying it before upgrading to something more expensive, I’d recommend you get that instead.

Why Buy the X5C

There are two main reasons to buy the Syma X5C: you interested in drone photography but want to learn on something cheaper than a DJI Phantom or you want a cool gadget to play around with occasionally. If either of these describes you, go and buy an X5C now.
The X5C is cheap — and sturdy — enough that you can fly it without any fear of breaking the bank if something goes wrong. In all likelihood, you won’t actually damage the drone even if you fly it into things, but if you somehow do you’re not out several hundred dollars. It is absolutely perfect for getting the feel for piloting quadcopters before investing in something bigger and better.
It’s also a pretty sweet gadget in its own right. If you know a child — or child-like-adult — who’s at all interested in planes, drones or cool gadgets, the X5C is a great present.

Wrapping Up

When reviewing tech products I always try to keep in mind “you get what you pay for”. Dismissing a $200 Chromebook because it can’t run Photoshop doesn’t help anyone. With the Syma X5C you don’t get what you pay for: you get far, far more.